reveal

reveal.js 中文文档

reveal.js 是一个使用HTML轻松创建漂亮演示文稿的框架。查看实时演示

reveal.js提供了广泛的功能,包括嵌套幻灯片Markdown支持PDF导出演讲者注释JavaScript API。还有一个功能完善的可视化编辑器和共享reveal.js演示文稿的平台slides.com

目录

更多阅读

  • 更新日志: 最新版本历史记录。
  • 示例: 使用reveal.js创建的演示文稿,可以添加自己的内容!
  • 浏览器支持: 关于浏览器支持和回退的说明。
  • 插件: 可以用来扩展reveal.js的插件列表。

在线编辑器

演示文稿可以使用HTML或Markdown编写,但也提供了一个在线编辑器,供那些更喜欢图形界面的人使用。请尝试访问https://slides.com

安装

基本设置仅用于创建演示文稿。完整设置可以让您访问reveal.js的所有功能和插件,例如演讲者注释,以及进行源代码更改所需的开发任务。

基本设置

reveal.js的核心非常容易安装。您只需要下载此存储库的副本,并直接在浏览器中打开index.html文件。

  1. https://github.com/hakimel/reveal.js/releases下载最新版本的reveal.js
  2. 解压缩并用自己的内容替换index.html中的示例内容
  3. 在浏览器中打开index.html以查看它

完整设置

一些 reveal.js 的特性,比如外部 Markdown 和演讲者备注,需要在本地的 web 服务器上运行演示文稿。下面的说明将设置这样一个服务器,以及进行编辑 reveal.js 源代码所需的所有开发任务。

  1. 安装 Node.js(9.0.0 或更高版本)

  2. 克隆 reveal.js 仓库

    1
    $ git clone https://github.com/hakimel/reveal.js.git
  3. 进入 reveal.js 文件夹

    1
    $ cd reveal.js
  4. 安装依赖项

    1
    $ npm install
  5. 启动演示并监视源文件的更改

    1
    $ npm start
  6. 打开 http://localhost:8000 查看演示

    您可以使用 npm start -- --port=8001 来更改端口。

文件夹结构

  • css/ 核心样式,项目无法正常运行的必备组件
  • js/ 与上述类似,但用于JavaScript
  • plugin/ 作为reveal.js的扩展开发的组件
  • lib/ 所有其他第三方资源(JavaScript、CSS、字体)

说明

标记

下面是一个简单的示例,展示了一个完整工作的reveal.js演示文稿:

1
2
3
4
5
6
7
8
9
10
11
12
13
14
15
16
17
18
<html>
<head>
<link rel="stylesheet" href="css/reveal.css">
<link rel="stylesheet" href="css/theme/white.css">
</head>
<body>
<div class="reveal">
<div class="slides">
<section>Slide 1</section>
<section>Slide 2</section>
</div>
</div>
<script src="js/reveal.js"></script>
<script>
Reveal.initialize();
</script>
</body>
</html>

演示文稿的标记层次结构应为.reveal > .slides > section,其中section表示一个幻灯片,并可以无限重复。如果您在另一个section中放置多个section元素,它们将显示为垂直幻灯片。垂直幻灯片中的第一张幻灯片是其他幻灯片的“根”(在顶部),并将包含在水平顺序中。例如:

1
2
3
4
5
6
7
8
9
<div class="reveal">
<div class="slides">
<section>Single Horizontal Slide</section>
<section>
<section>Vertical Slide 1</section>
<section>Vertical Slide 2</section>
</section>
</div>
</div>

Markdown

可以使用Markdown编写幻灯片。要启用Markdown,请在<section>元素中添加data-markdown属性,并将内容包裹在<textarea data-template>中,如下面的示例所示。您还需要按照顺序将plugin/markdown/marked.jsplugin/markdown/markdown.js脚本添加到您的HTML文件中。

这是基于Paul Irishdata-markdown进行修改,使用marked来支持GitHub Flavored Markdown。对缩进(避免混用制表符和空格)和换行符(避免连续换行)非常敏感。

1
2
3
4
5
6
7
<section data-markdown>
<textarea data-template>
## Page title

A paragraph with some text and a [link](http://hakim.se).
</textarea>
</section>

外部 Markdown

您可以将内容编写为一个单独的文件,并在运行时由reveal.js加载。请注意分隔符参数,它决定了在外部文件中如何分隔幻灯片:data-separator属性定义了水平幻灯片的正则表达式(默认为^\r?\n---\r?\n$,一个以换行符为边界的水平规则),data-separator-vertical定义了垂直幻灯片(默认禁用)。data-separator-notes属性是用于指定当前幻灯片演讲者注释开头的正则表达式(默认为notes?:,因此它将匹配”note:”和”notes:”)。data-charset属性是可选的,用于指定加载外部文件时要使用的字符集。

当在本地使用时,此功能要求从本地web服务器运行reveal.js。以下示例自定义了所有可用选项:

1
2
3
4
5
6
7
8
9
10
<section data-markdown="example.md"
data-separator="^\n\n\n"
data-separator-vertical="^\n\n"
data-separator-notes="^Note:"
data-charset="iso-8859-15">
<!--
Note that Windows uses `\r\n` instead of `\n` as its linefeed character.
For a regex that supports all operating systems, use `\r?\n` instead of `\n`.
-->
</section>

元素属性

通过HTML注释,可以为Markdown元素添加特殊语法以添加属性。这对于片段等其他用途非常有用。

1
2
3
4
5
6
<section data-markdown>
<script type="text/template">
- Item 1 <!-- .element: class="fragment" data-fragment-index="2" -->
- Item 2 <!-- .element: class="fragment" data-fragment-index="1" -->
</script>
</section>

幻灯片属性

通过特殊的语法(通过HTML注释)可以为由Markdown生成的幻灯片<section>元素添加属性。

1
2
3
4
5
6
<section data-markdown>
<script type="text/template">
<!-- .slide: data-background="#ff0000" -->
Markdown content
</script>
</section>

配置 marked

我们使用 marked 解析 Markdown。要自定义 marked 的渲染,您可以在 配置 Reveal 时传递选项:

1
2
3
4
5
6
7
Reveal.initialize({
// Options which are passed into marked
// See https://marked.js.org/#/USING_ADVANCED.md#options
markdown: {
smartypants: true
}
});

配置

在页面的末尾,您需要运行以下代码来初始化reveal。请注意,所有配置值都是可选的,如果未指定,则默认为下面的值。

1
2
3
4
5
6
7
8
9
10
11
12
13
14
15
16
17
18
19
20
21
22
23
24
25
26
27
28
29
30
31
32
33
34
35
36
37
38
39
40
41
42
43
44
45
46
47
48
49
50
51
52
53
54
55
56
57
58
59
60
61
62
63
64
65
66
67
68
69
70
71
72
73
74
75
76
77
78
79
80
81
82
83
84
85
86
87
88
89
90
91
92
93
94
95
96
97
98
99
100
101
102
103
104
105
106
107
108
109
110
111
112
113
114
115
116
117
118
119
120
121
122
123
124
125
126
127
128
129
130
131
132
133
134
135
136
137
138
139
140
141
142
143
144
145
146
147
148
149
150
151
152
153
154
155
156
157
158
159
160
161
162
163
Reveal.initialize({

// Display presentation control arrows
controls: true,

// Help the user learn the controls by providing hints, for example by
// bouncing the down arrow when they first encounter a vertical slide
controlsTutorial: true,

// Determines where controls appear, "edges" or "bottom-right"
controlsLayout: 'bottom-right',

// Visibility rule for backwards navigation arrows; "faded", "hidden"
// or "visible"
controlsBackArrows: 'faded',

// Display a presentation progress bar
progress: true,

// Display the page number of the current slide
slideNumber: false,

// Add the current slide number to the URL hash so that reloading the
// page/copying the URL will return you to the same slide
hash: false,

// Push each slide change to the browser history. Implies `hash: true`
history: false,

// Enable keyboard shortcuts for navigation
keyboard: true,

// Enable the slide overview mode
overview: true,

// Vertical centering of slides
center: true,

// Enables touch navigation on devices with touch input
touch: true,

// Loop the presentation
loop: false,

// Change the presentation direction to be RTL
rtl: false,

// See https://github.com/hakimel/reveal.js/#navigation-mode
navigationMode: 'default',

// Randomizes the order of slides each time the presentation loads
shuffle: false,

// Turns fragments on and off globally
fragments: true,

// Flags whether to include the current fragment in the URL,
// so that reloading brings you to the same fragment position
fragmentInURL: false,

// Flags if the presentation is running in an embedded mode,
// i.e. contained within a limited portion of the screen
embedded: false,

// Flags if we should show a help overlay when the questionmark
// key is pressed
help: true,

// Flags if speaker notes should be visible to all viewers
showNotes: false,

// Global override for autoplaying embedded media (video/audio/iframe)
// - null: Media will only autoplay if data-autoplay is present
// - true: All media will autoplay, regardless of individual setting
// - false: No media will autoplay, regardless of individual setting
autoPlayMedia: null,

// Global override for preloading lazy-loaded iframes
// - null: Iframes with data-src AND data-preload will be loaded when within
// the viewDistance, iframes with only data-src will be loaded when visible
// - true: All iframes with data-src will be loaded when within the viewDistance
// - false: All iframes with data-src will be loaded only when visible
preloadIframes: null,

// Number of milliseconds between automatically proceeding to the
// next slide, disabled when set to 0, this value can be overwritten
// by using a data-autoslide attribute on your slides
autoSlide: 0,

// Stop auto-sliding after user input
autoSlideStoppable: true,

// Use this method for navigation when auto-sliding
autoSlideMethod: Reveal.navigateNext,

// Specify the average time in seconds that you think you will spend
// presenting each slide. This is used to show a pacing timer in the
// speaker view
defaultTiming: 120,

// Specify the total time in seconds that is available to
// present. If this is set to a nonzero value, the pacing
// timer will work out the time available for each slide,
// instead of using the defaultTiming value
totalTime: 0,

// Specify the minimum amount of time you want to allot to
// each slide, if using the totalTime calculation method. If
// the automated time allocation causes slide pacing to fall
// below this threshold, then you will see an alert in the
// speaker notes window
minimumTimePerSlide: 0,

// Enable slide navigation via mouse wheel
mouseWheel: false,

// Hide cursor if inactive
hideInactiveCursor: true,

// Time before the cursor is hidden (in ms)
hideCursorTime: 5000,

// Hides the address bar on mobile devices
hideAddressBar: true,

// Opens links in an iframe preview overlay
// Add `data-preview-link` and `data-preview-link="false"` to customise each link
// individually
previewLinks: false,

// Transition style
transition: 'slide', // none/fade/slide/convex/concave/zoom

// Transition speed
transitionSpeed: 'default', // default/fast/slow

// Transition style for full page slide backgrounds
backgroundTransition: 'fade', // none/fade/slide/convex/concave/zoom

// Number of slides away from the current that are visible
viewDistance: 3,

// Number of slides away from the current that are visible on mobile
// devices. It is advisable to set this to a lower number than
// viewDistance in order to save resources.
mobileViewDistance: 2,

// Parallax background image
parallaxBackgroundImage: '', // e.g. "'https://s3.amazonaws.com/hakim-static/reveal-js/reveal-parallax-1.jpg'"

// Parallax background size
parallaxBackgroundSize: '', // CSS syntax, e.g. "2100px 900px"

// Number of pixels to move the parallax background per slide
// - Calculated automatically unless specified
// - Set to 0 to disable movement along an axis
parallaxBackgroundHorizontal: null,
parallaxBackgroundVertical: null,

// The display mode that will be used to show slides
display: 'block'

});

配置可以在初始化后使用configure方法进行更新:

1
2
3
4
5
// Turn autoSlide off
Reveal.configure({ autoSlide: 0 });

// Start auto-sliding every 5s
Reveal.configure({ autoSlide: 5000 });

演示尺寸

所有演示都有一个正常的尺寸,也就是它们的作者所设定的分辨率。框架会根据这个尺寸自动按比例缩放演示,以确保在任何显示器或视口上都能完整显示。

以下是与尺寸相关的配置选项列表,包括默认值:

1
2
3
4
5
6
7
8
9
10
11
12
13
14
15
16
17
18
Reveal.initialize({

// ...

// The "normal" size of the presentation, aspect ratio will be preserved
// when the presentation is scaled to fit different resolutions. Can be
// specified using percentage units.
width: 960,
height: 700,

// Factor of the display size that should remain empty around the content
margin: 0.1,

// Bounds for smallest/largest possible scale to apply to content
minScale: 0.2,
maxScale: 1.5

});

如果您希望禁用此行为并自行进行缩放(例如使用媒体查询),请尝试以下设置:

1
2
3
4
5
6
7
8
9
10
Reveal.initialize({

// ...

width: "100%",
height: "100%",
margin: 0,
minScale: 1,
maxScale: 1
});

依赖项

Reveal.js并不依赖任何第三方脚本来工作,但是默认情况下会包含一些可选的库。这些库按照它们出现的顺序作为依赖项加载,例如:

1
2
3
4
5
6
7
8
9
10
11
12
13
14
15
16
17
18
19
Reveal.initialize({
dependencies: [
// Interpret Markdown in <section> elements
{ src: 'plugin/markdown/marked.js', condition: function() { return !!document.querySelector( '[data-markdown]' ); } },
{ src: 'plugin/markdown/markdown.js', condition: function() { return !!document.querySelector( '[data-markdown]' ); } },

// Syntax highlight for <code> elements
{ src: 'plugin/highlight/highlight.js', async: true },

// Zoom in and out with Alt+click
{ src: 'plugin/zoom-js/zoom.js', async: true },

// Speaker notes
{ src: 'plugin/notes/notes.js', async: true },

// MathJax
{ src: 'plugin/math/math.js', async: true }
]
});

您可以使用相同的语法添加自己的扩展。对于每个依赖对象,有以下属性可用:

  • src:要加载的脚本的路径
  • async:[可选] 指定脚本是否在 reveal.js 启动后加载,默认为 false
  • callback:[可选] 脚本加载完成后要执行的函数
  • condition:[可选] 必须返回 true 才能加载脚本的函数

就绪事件

当reveal.js加载所有非异步依赖项并准备好开始导航时,将触发ready事件。要检查reveal.js是否已经准备就绪,可以调用Reveal.isReady()

1
2
3
Reveal.addEventListener( 'ready', function( event ) {
// event.currentSlide, event.indexh, event.indexv
} );

请注意,我们还将.ready类添加到.reveal元素中,以便您可以使用CSS进行钩子操作。

自动滑动

演示文稿可以配置为在没有任何用户输入的情况下自动进入下一张幻灯片。为了启用这个功能,您需要告诉框架在幻灯片之间应该等待多少毫秒:

1
2
3
4
// Slide every five seconds
Reveal.configure({
autoSlide: 5000
});

当启用此选项时,会出现一个控制元素,允许用户暂停和恢复自动幻灯片播放。或者,按下键盘上的“A”键也可以暂停或恢复幻灯片播放。当用户开始导航时,幻灯片播放会自动暂停。您可以通过在reveal.js配置中指定autoSlideStoppable: false来禁用这些控件。

您还可以通过使用data-autoslide属性来覆盖单个幻灯片和片段的幻灯片持续时间:

1
2
3
4
5
<section data-autoslide="2000">
<p>After 2 seconds the first fragment will be shown.</p>
<p class="fragment" data-autoslide="10000">After 10 seconds the next fragment will be shown.</p>
<p class="fragment">Now, the fragment is displayed for 2 seconds before the next slide is shown.</p>
</section>

要覆盖自动滑动时使用的导航方法,可以指定autoSlideMethod设置。要仅在顶层导航并忽略垂直幻灯片,请将其设置为Reveal.navigateRight

每当自动滑动模式恢复或暂停时,都会触发autoslideresumedautoslidepaused事件。

键盘绑定

如果您对任何默认的键盘绑定不满意,可以使用keyboard配置选项进行覆盖:

1
2
3
4
5
6
7
Reveal.configure({
keyboard: {
13: 'next', // go to the next slide when the ENTER key is pressed
27: function() {}, // do something custom when ESC is pressed
32: null // don't do anything when SPACE is pressed (i.e. disable a reveal.js default binding)
}
});

垂直幻灯片导航

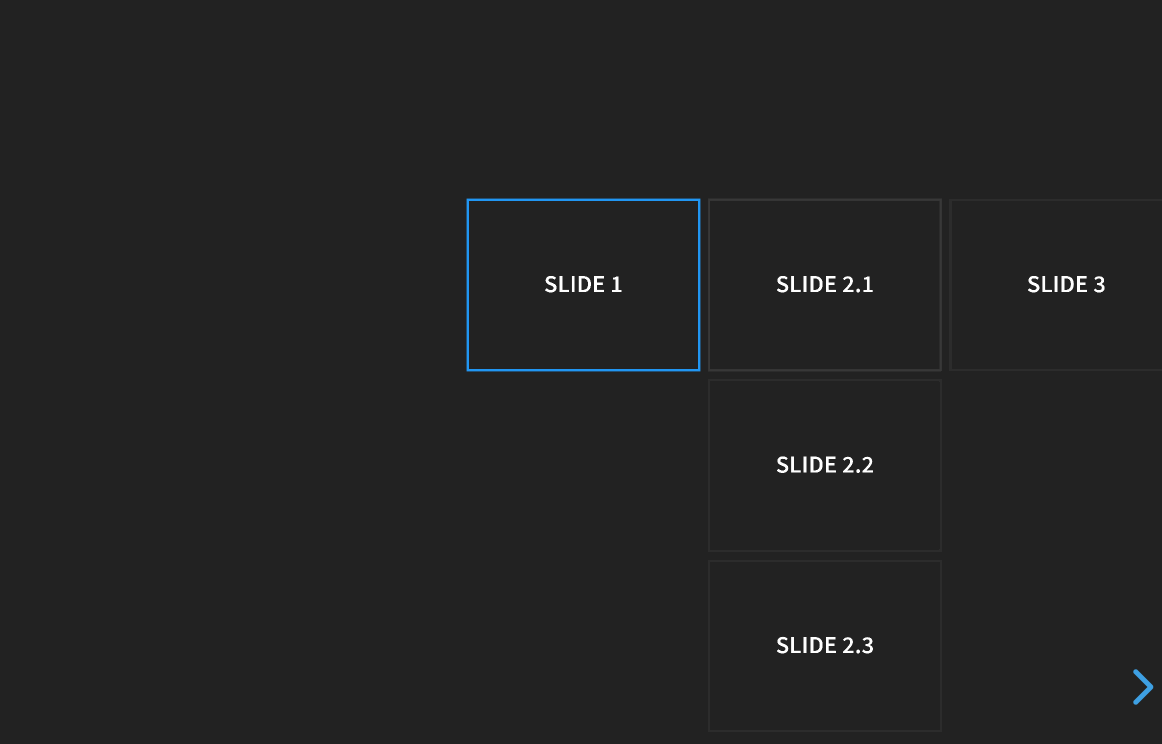
幻灯片可以嵌套在其他幻灯片中,以创建垂直堆叠(参见标记)。在演示时,您可以使用左/右箭头在主(水平)幻灯片之间进行切换。当您到达一个垂直堆叠时,您可以选择按上/下箭头查看垂直幻灯片,或者按右箭头跳过它们。以下是一个示例,展示了这个过程的鸟瞰图:

导航模式

您可以通过使用navigationMode配置选项来微调reveal.js的导航行为。请注意,这些选项仅适用于同时使用水平和垂直幻灯片的演示文稿。以下导航模式可用:

描述
default 使用左/右箭头键在水平幻灯片之间切换。使用上/下箭头键在垂直幻灯片之间切换。使用空格键在所有幻灯片中切换(水平和垂直)。
linear 移除上/下箭头。使用左/右箭头键在所有幻灯片中切换(水平和垂直)。
grid 当启用此选项时,从一个垂直堆栈跳转到相邻的垂直堆栈时,您将会停留在相同的垂直索引位置。

假设有一个包含六个幻灯片的卡片组,按照两个垂直堆栈的顺序排列:
1.1    2.1
1.2    2.2
1.3    2.3

如果您在幻灯片1.3上并向右导航,通常会从1.3跳转到2.1。但是,如果将navigationMode设置为”grid”,则同样的导航将从1.3跳转到2.3。

触摸导航

您可以在任何支持触摸的设备上通过滑动来导航演示文稿。水平滑动在水平幻灯片之间切换,垂直滑动在垂直幻灯片之间切换。如果您希望禁用此功能,可以在初始化reveal.js时将touch配置选项设置为false。

如果您的内容中有一部分需要保持对触摸事件的可访问性,您需要在元素中添加data-prevent-swipe属性来突出显示这一点。一个常见的例子是需要滚动的元素。

延迟加载

当处理包含大量媒体或iframe内容的演示文稿时,懒加载非常重要。懒加载意味着reveal.js只会加载当前幻灯片附近的几个幻灯片的内容。预加载的幻灯片数量由viewDistance配置选项确定。

要启用懒加载,您只需要将src属性更改为如下所示的data-src。这适用于图像、视频、音频和iframe元素。

1
2
3
4
5
6
7
8
<section>
<img data-src="image.png">
<iframe data-src="http://hakim.se"></iframe>
<video>
<source data-src="video.webm" type="video/webm" />
<source data-src="video.mp4" type="video/mp4" />
</video>
</section>

延迟加载 iframe

请注意,延迟加载的 iframe 会忽略 viewDistance 配置,并且只有在其所在的幻灯片变为可见时才会加载。当幻灯片被隐藏时,iframe 也会被卸载。

当我们延迟加载视频或音频元素时,reveal.js不会在幻灯片可见之前开始播放该内容。但是对于iframe来说,没有办法控制这一点,因为它可以包含任何类型的内容。这意味着,如果我们在幻灯片在屏幕上可见之前加载了一个iframe,它可能会在后台播放媒体和声音。

您可以使用data-preload属性覆盖此行为。下面的iframe将根据viewDistance进行加载。

1
2
3
<section>
<iframe data-src="http://hakim.se" data-preload></iframe>
</section>

您还可以使用preloadIframes配置选项全局更改默认设置。如果设置为true,则所有具有data-src属性的iframe将在viewDistance范围内预加载,而不考虑各自的data-preload属性。如果设置为false,则只有当iframe变为可见时才会加载。

API

Reveal对象提供了JavaScript API,用于控制导航和阅读状态:

1
2
3
4
5
6
7
8
9
10
11
12
13
14
15
16
17
18
19
20
21
22
23
24
25
26
27
28
29
30
31
32
33
34
35
36
37
38
39
40
41
42
43
44
45
46
47
48
49
50
51
52
53
54
55
56
57
58
59
60
61
62
63
// Navigation
Reveal.slide( indexh, indexv, indexf );
Reveal.left();
Reveal.right();
Reveal.up();
Reveal.down();
Reveal.prev();
Reveal.next();
Reveal.prevFragment();
Reveal.nextFragment();

// Randomize the order of slides
Reveal.shuffle();

// Toggle presentation states, optionally pass true/false to force on/off
Reveal.toggleOverview();
Reveal.togglePause();
Reveal.toggleAutoSlide();

// Shows a help overlay with keyboard shortcuts, optionally pass true/false
// to force on/off
Reveal.toggleHelp();

// Change a config value at runtime
Reveal.configure({ controls: true });

// Returns the present configuration options
Reveal.getConfig();

// Fetch the current scale of the presentation
Reveal.getScale();

// Retrieves the previous and current slide elements
Reveal.getPreviousSlide();
Reveal.getCurrentSlide();

Reveal.getIndices(); // { h: 0, v: 0, f: 0 }
Reveal.getSlidePastCount();
Reveal.getProgress(); // (0 == first slide, 1 == last slide)
Reveal.getSlides(); // Array of all slides
Reveal.getTotalSlides(); // Total number of slides

// Returns an array with all horizontal/vertical slides in the deck
Reveal.getHorizontalSlides();
Reveal.getVerticalSlides();

// Checks if the presentation contains two or more
// horizontal/vertical slides
Reveal.hasHorizontalSlides();
Reveal.hasVerticalSlides();

// Returns the speaker notes for the current slide
Reveal.getSlideNotes();

// State checks
Reveal.isFirstSlide();
Reveal.isLastSlide();
Reveal.isOverview();
Reveal.isPaused();
Reveal.isAutoSliding();

// Returns the top-level DOM element
Reveal.getRevealElement(); // <div class="reveal">...</div>

自定义按键绑定

可以使用以下的Javascript API来添加和删除自定义按键绑定。自定义按键绑定将覆盖默认的键盘绑定,但会被用户在keyboard配置选项中定义的绑定所覆盖。

1
2
Reveal.addKeyBinding( binding, callback );
Reveal.removeKeyBinding( keyCode );

例如

1
2
3
4
5
6
7
8
9
10
11
12
// The binding parameter provides the following properties
// keyCode: the keycode for binding to the callback
// key: the key label to show in the help overlay
// description: the description of the action to show in the help overlay
Reveal.addKeyBinding( { keyCode: 84, key: 'T', description: 'Start timer' }, function() {
// start timer
} )

// The binding parameter can also be a direct keycode without providing the help description
Reveal.addKeyBinding( 82, function() {
// reset timer
} )

这允许插件直接向Reveal添加按键绑定,以便它们可以:

  • 利用Reveal的按键处理预处理逻辑(例如,在暂停时忽略按键);
  • 被包含在帮助叠加层中(可选)

幻灯片变更事件

每次幻灯片变更(无论其状态如何),都会触发一个slidechanged事件。事件对象包含当前幻灯片的索引值,以及对前一幻灯片和当前幻灯片HTML节点的引用。

有些库,比如MathJax(参见#226),会因为幻灯片的变换和显示状态而产生困惑。通常情况下,可以通过从此回调函数调用它们的更新或渲染函数来解决这个问题。

1
2
3
Reveal.addEventListener( 'slidechanged', function( event ) {
// event.previousSlide, event.currentSlide, event.indexh, event.indexv
} );

演示状态

可以使用getState方法来获取演示的当前状态。状态对象包含了在第一次调用getState时还原演示所需的所有信息,类似于快照。它是一个简单的对象,可以轻松地转换为字符串并持久化或通过网络发送。

1
2
3
4
5
6
7
8
9
10
Reveal.slide( 1 );
// we're on slide 1

var state = Reveal.getState();

Reveal.slide( 3 );
// we're on slide 3

Reveal.setState( state );
// we're back on slide 1

幻灯片状态

如果在幻灯片的<section>元素上设置data-state="somestate",当打开该幻灯片时,”somestate”将作为一个类应用于文档元素。这样,您就可以基于活动幻灯片对页面应用广泛的样式更改。

此外,您还可以通过JavaScript监听这些状态的变化:

1
2
3
Reveal.addEventListener( 'somestate', function() {
// TODO: Sprinkle magic
}, false );

幻灯片背景

默认情况下,幻灯片被限制在屏幕的一部分内,以适应任何显示器并进行统一的缩放。您可以通过给 <section> 元素添加 data-background 属性来应用全页背景,使其超出幻灯片区域。支持四种不同类型的背景:颜色、图片、视频和iframe。

颜色背景

支持所有的CSS颜色格式,包括十六进制值、关键字、rgba()hsl()

1
2
3
<section data-background-color="#ff0000">
<h2>Color</h2>
</section>

图片背景

默认情况下,背景图片会被调整大小以覆盖整个页面。可用选项:

属性 默认值 描述
data-background-image 要显示的图像的URL。 GIF 在幻灯片打开时重新启动。
data-background-size cover 请参阅 background-size 在 MDN 上的说明。
data-background-position center 请参阅 background-position 在 MDN 上的文档。
data-background-repeat no-repeat 请参阅 background-repeat 在 MDN 上的文档。
data-background-opacity 1 背景图像的不透明度,范围为0到1。0 表示完全透明,1 表示完全不透明。
1
2
3
4
5
6
<section data-background-image="http://example.com/image.png">
<h2>Image</h2>
</section>
<section data-background-image="http://example.com/image.png" data-background-size="100px" data-background-repeat="repeat">
<h2>This background image will be sized to 100px and repeated</h2>
</section>

视频背景

在幻灯片后自动播放全屏视频。

属性 默认值 描述
data-background-video 单个视频源,或逗号分隔的视频源列表。
data-background-video-loop false 指示视频是否应重复播放。
data-background-video-muted false 指示音频是否应静音。
data-background-size cover 使用cover来实现全屏和一定的裁剪,使用contain来实现留白效果。
data-background-opacity 1 背景视频的透明度,取值范围为0-1。0表示完全透明,1表示完全不透明。
1
2
3
<section data-background-video="https://s3.amazonaws.com/static.slid.es/site/homepage/v1/homepage-video-editor.mp4,https://s3.amazonaws.com/static.slid.es/site/homepage/v1/homepage-video-editor.webm" data-background-video-loop data-background-video-muted>
<h2>Video</h2>
</section>

嵌入式页面背景

将一个网页作为幻灯片背景嵌入,覆盖100%的reveal.js宽度和高度。该iframe位于背景层,在幻灯片之后,因此默认情况下无法与之交互。要使背景可交互,您可以添加data-background-interactive属性。

1
2
3
<section data-background-iframe="https://slides.com" data-background-interactive>
<h2>Iframe</h2>
</section>

<iframe>元素变为可见时,它们会进行延迟加载。如果您想提前预加载<iframe>,可以将data-preload属性添加到幻灯片<section>中。您还可以使用preloadIframes配置选项全局启用预加载所有<iframe>

背景过渡效果

默认情况下,使用淡入淡出动画进行背景过渡。可以通过在Reveal.initialize()调用中传递backgroundTransition: 'slide'来将其更改为线性滑动过渡。或者,您可以在具有背景的任何部分上设置data-background-transition以覆盖特定的过渡效果。

视差背景

如果您想使用视差滚动背景,请在初始化reveal.js时设置下面的前两个属性(其他两个是可选的)。

1
2
3
4
5
6
7
8
9
10
11
12
13
14
15
Reveal.initialize({

// Parallax background image
parallaxBackgroundImage: '', // e.g. "https://s3.amazonaws.com/hakim-static/reveal-js/reveal-parallax-1.jpg"

// Parallax background size
parallaxBackgroundSize: '', // CSS syntax, e.g. "2100px 900px" - currently only pixels are supported (don't use % or auto)

// Number of pixels to move the parallax background per slide
// - Calculated automatically unless specified
// - Set to 0 to disable movement along an axis
parallaxBackgroundHorizontal: 200,
parallaxBackgroundVertical: 50

});

请确保背景大小远大于屏幕大小,以允许一些滚动。查看示例

幻灯片过渡效果

全局演示过渡效果是使用transition配置值设置的。您可以通过使用data-transition属性来覆盖特定幻灯片的全局过渡效果:

1
2
3
4
5
6
7
<section data-transition="zoom">
<h2>This slide will override the presentation transition and zoom!</h2>
</section>

<section data-transition-speed="fast">
<h2>Choose from three transition speeds: default, fast or slow!</h2>
</section>

您还可以为同一幻灯片使用不同的进入和退出过渡效果:

1
2
3
4
5
6
7
8
9
10
11
12
13
14
15
<section data-transition="slide">
The train goes on …
</section>
<section data-transition="slide">
and on …
</section>
<section data-transition="slide-in fade-out">
and stops.
</section>
<section data-transition="fade-in slide-out">
(Passengers entering and leaving)
</section>
<section data-transition="slide">
And it starts again.
</section>

您可以选择 none, fade, slide, convex, concavezoom

内部链接

在幻灯片之间建立链接非常简单。下面的第一个示例链接到另一张幻灯片的索引,而第二个示例链接到带有ID属性的幻灯片(<section id="some-slide">):

1
2
<a href="#/2/2">Link</a>
<a href="#/some-slide">Link</a>

您还可以添加相对导航链接,类似于内置的reveal.js控件,只需在任何元素上附加以下类之一即可。请注意,每个元素在当前幻灯片的基础上自动被赋予一个“enabled”类,以表示它是一个有效的导航路由。

1
2
3
4
5
6
<a href="#" class="navigate-left">
<a href="#" class="navigate-right">
<a href="#" class="navigate-up">
<a href="#" class="navigate-down">
<a href="#" class="navigate-prev"> <!-- Previous vertical or horizontal slide -->
<a href="#" class="navigate-next"> <!-- Next vertical or horizontal slide -->

片段

片段用于突出显示幻灯片上的各个元素。具有 fragment 类的每个元素将在切换到下一张幻灯片之前逐步显示。以下是一个示例:http://revealjs.com/#/fragments

默认的片段样式是初始时不可见,并淡入显示。可以通过在片段后附加不同的类来更改此样式:

1
2
3
4
5
6
7
8
9
10
11
12
13
<section>
<p class="fragment grow">grow</p>
<p class="fragment shrink">shrink</p>
<p class="fragment strike">strike</p>
<p class="fragment fade-out">fade-out</p>
<p class="fragment fade-up">fade-up (also down, left and right!)</p>
<p class="fragment fade-in-then-out">fades in, then out when we move to the next step</p>
<p class="fragment fade-in-then-semi-out">fades in, then obfuscate when we move to the next step</p>
<p class="fragment highlight-current-blue">blue only once</p>
<p class="fragment highlight-red">highlight-red</p>
<p class="fragment highlight-green">highlight-green</p>
<p class="fragment highlight-blue">highlight-blue</p>
</section>

多个片段可以按顺序应用于同一个元素,通过将其包装起来,这将在第一步中淡入文本,然后在第二步中淡出文本。

1
2
3
4
5
<section>
<span class="fragment fade-in">
<span class="fragment fade-out">I'll fade in, then out</span>
</span>
</section>

可以使用data-fragment-index属性来控制片段的显示顺序。

1
2
3
4
5
<section>
<p class="fragment" data-fragment-index="3">Appears last</p>
<p class="fragment" data-fragment-index="1">Appears first</p>
<p class="fragment" data-fragment-index="2">Appears second</p>
</section>

片段事件

当幻灯片的片段显示或隐藏时,reveal.js会触发一个事件。

一些库,比如MathJax(参见#505),对最初隐藏的片段元素感到困惑。通常情况下,可以通过从此回调函数调用它们的更新或渲染函数来解决这个问题。

1
2
3
4
5
6
Reveal.addEventListener( 'fragmentshown', function( event ) {
// event.fragment = the fragment DOM element
} );
Reveal.addEventListener( 'fragmenthidden', function( event ) {
// event.fragment = the fragment DOM element
} );

代码语法高亮

默认情况下,Reveal使用highlight.js进行代码语法高亮。要启用语法高亮,您需要加载highlight插件(plugin/highlight/highlight.js)和一个highlight.js的CSS主题(Reveal已经预装了Monokai主题:lib/css/monokai.css)。

1
2
3
4
5
6
Reveal.initialize({
// More info https://github.com/hakimel/reveal.js#dependencies
dependencies: [
{ src: 'plugin/highlight/highlight.js', async: true },
]
});

下面是一个包含Clojure代码的示例,将进行语法突出显示。当存在data-trim属性时,周围的空白将自动删除。默认情况下,HTML将被转义。如果要避免这种情况,例如,如果您使用<mark>来强调一行代码,请将data-noescape属性添加到<code>元素中。

1
2
3
4
5
6
7
8
9
<section>
<pre><code data-trim data-noescape>
(def lazy-fib
(concat
[0 1]
<mark>((fn rfib [a b]</mark>
(lazy-cons (+ a b) (rfib b (+ a b)))) 0 1)))
</code></pre>
</section>

行号和高亮显示

要启用行号,请在 <code> 标签中添加 data-line-numbers 属性。如果您想要高亮显示特定行,可以使用相同的属性提供一个逗号分隔的行号列表。例如,在下面的示例中,第4行和第8-11行被高亮显示:

1
2
3
4
5
6
7
8
9
10
11
12
13
14
15
16
<pre><code class="hljs" data-line-numbers="4,8-11">
import React, { useState } from 'react';

function Example() {
const [count, setCount] = useState(0);

return (
<div>
<p>You clicked {count} times</p>
<button onClick={() => setCount(count + 1)}>
Click me
</button>
</div>
);
}
</code></pre>
line-numbers

逐步亮点

您可以在同一代码块上逐步执行多个代码亮点。使用|字符分隔每个亮点步骤。例如,data-line-numbers="1|2-3|4,6-10"将生成三个步骤。它将首先突出显示第1行,下一步是第2-3行,最后是第4行和第6到10行。

幻灯片编号

如果您想显示当前幻灯片的页码,可以使用slideNumbershowSlideNumber配置值。

1
2
3
4
5
6
7
8
9
10
11
12
13
14
15
16
17
18
19
20
21
// Shows the slide number using default formatting
Reveal.configure({ slideNumber: true });

// Slide number formatting can be configured using these variables:
// "h.v": horizontal . vertical slide number (default)
// "h/v": horizontal / vertical slide number
// "c": flattened slide number
// "c/t": flattened slide number / total slides
Reveal.configure({ slideNumber: 'c/t' });

// You can provide a function to fully customize the number:
Reveal.configure({ slideNumber: function( slide ) {
// Ignore numbering of vertical slides
return [ Reveal.getIndices( slide ).h ];
}});

// Control which views the slide number displays on using the "showSlideNumber" value:
// "all": show on all views (default)
// "speaker": only show slide numbers on speaker notes view
// "print": only show slide numbers when printing to PDF
Reveal.configure({ showSlideNumber: 'speaker' });

概览模式

按下 “ESC” 或 “O” 键可以切换概览模式的开启和关闭。在这个模式下,您仍然可以在幻灯片之间进行导航,就像您在演示文稿上方 1,000 英尺的高度一样。概览模式带有一些 API 钩子:

1
2
3
4
5
Reveal.addEventListener( 'overviewshown', function( event ) { /* ... */ } );
Reveal.addEventListener( 'overviewhidden', function( event ) { /* ... */ } );

// Toggle the overview mode programmatically
Reveal.toggleOverview();

全屏模式

只需按下键盘上的“F”键即可将演示文稿显示为全屏模式。按下“ESC”键退出全屏模式。

嵌入媒体

如果希望在幻灯片显示时自动开始播放媒体元素,请将 data-autoplay 添加到您的媒体元素中:

1
<video data-autoplay src="http://clips.vorwaerts-gmbh.de/big_buck_bunny.mp4"></video>

如果您想要在全局范围内启用或禁用自动播放,可以使用autoPlayMedia配置选项。如果将其设置为true,所有媒体都将自动播放,而不考虑各个data-autoplay属性。如果使用autoPlayMedia: false进行初始化,则没有媒体会自动播放。

请注意,当您从一张幻灯片切换到另一张幻灯片时,嵌入的HTML5 <video>/<audio>和YouTube/Vimeo的iframe会自动暂停。您可以通过为元素添加data-ignore属性来禁用此功能。

嵌入的iframe

reveal.js会自动向嵌入的iframe发送两个post message。当包含iframe的幻灯片可见时,会发送slide:start消息,当幻灯片隐藏时,则发送slide:stop消息。

元素拉伸

有时候希望一个元素,如图像或视频,在给定幻灯片内尽可能地拉伸以占据更多的空间。可以通过将.stretch类添加到元素中来实现,如下所示:

1
2
3
4
<section>
<h2>This video will use up the remaining space on the slide</h2>
<video class="stretch" src="http://clips.vorwaerts-gmbh.de/big_buck_bunny.mp4"></video>
</section>

限制:

  • 只能拉伸幻灯片部分的直接子孙元素
  • 每个幻灯片部分只能拉伸一个子孙元素

调整大小事件

当reveal.js改变幻灯片的缩放比例时,会触发一个调整大小事件。您可以订阅该事件,以相应地调整您的元素大小。

1
2
3
Reveal.addEventListener( 'resize', function( event ) {
// event.scale, event.oldScale, event.size
} );

postMessage API

该框架内置了postMessage API,用于在与另一个窗口中的演示文稿进行通信时使用。以下是一个示例,展示了如何让给定窗口中的reveal.js实例跳转到第2张幻灯片:

1
<window>.postMessage( JSON.stringify({ method: 'slide', args: [ 2 ] }), '*' );

postMessage 事件

当 reveal.js 运行在一个 iframe 内部时,可以选择将所有事件冒泡到父窗口。冒泡的事件是一个包含三个字段的 JSON 字符串:namespace、eventName 和 state。下面是如何从父窗口订阅这些事件:

1
2
3
4
5
6
window.addEventListener( 'message', function( event ) {
var data = JSON.parse( event.data );
if( data.namespace === 'reveal' && data.eventName === 'slidechanged' ) {
// Slide changed, see data.state for slide number
}
} );

postMessage 回调函数

当您通过 postMessage API 调用任何方法时,reveal.js 将会发送一条带有返回值的消息。这样做是为了让您可以调用 getter 方法并查看结果。请查看以下示例:

1
2
3
4
5
6
7
8
9
<revealWindow>.postMessage( JSON.stringify({ method: 'getTotalSlides' }), '*' );

window.addEventListener( 'message', function( event ) {
var data = JSON.parse( event.data );
// `data.method`` is the method that we invoked
if( data.namespace === 'reveal' && data.eventName === 'callback' && data.method === 'getTotalSlides' ) {
data.result // = the total number of slides
}
} );

打开/关闭 postMessage

可以使用配置标志打开或关闭跨窗口消息传递。这些是默认值。

1
2
3
4
5
6
7
8
9
Reveal.initialize({
// ...

// Exposes the reveal.js API through window.postMessage
postMessage: true,

// Dispatches all reveal.js events to the parent window through postMessage
postMessageEvents: false
});

PDF导出

演示文稿可以通过特殊的打印样式表导出为PDF文件。此功能要求您使用Google ChromeChromium,并且从Web服务器上提供演示文稿。

这是一个已经上传到SlideShare的导出演示文稿的示例:http://www.slideshare.net/hakimel/revealjs-300。

为片段创建单独的页面

默认情况下,Fragments 在幻灯片上分别打印。也就是说,如果你有一个包含三个 fragment 步骤的幻灯片,它将生成三个单独的幻灯片,其中 fragments 逐渐出现。

如果你希望在同一张幻灯片上打印出所有 fragments 的可见状态,你可以将 pdfSeparateFragments 配置选项设置为 false。

页面大小

导出的尺寸是根据配置的演示尺寸推断出来的。高度超过单页的幻灯片将会扩展到多页上。您可以使用pdfMaxPagesPerSlide配置选项来限制每张幻灯片可以扩展到多少页,例如Reveal.configure({ pdfMaxPagesPerSlide: 1 })可以确保每张幻灯片最多只占用一页打印纸。

打印样式表

要在演示文稿中启用PDF打印功能,必须加载特殊的打印样式表/css/print/pdf.css。默认的index.html文件在查询字符串中包含print-pdf时会处理此操作。如果您使用的是不同的HTML模板,可以将以下内容添加到头部:

1
2
3
4
5
6
7
<script>
var link = document.createElement( 'link' );
link.rel = 'stylesheet';
link.type = 'text/css';
link.href = window.location.search.match( /print-pdf/gi ) ? 'css/print/pdf.css' : 'css/print/paper.css';
document.getElementsByTagName( 'head' )[0].appendChild( link );
</script>

操作指南

  1. 在查询字符串中包含print-pdf,打开演示文稿,例如:http://localhost:8000/?print-pdf。您可以使用[revealjs.com?print-pdf](http://revealjs.com?print-pdf)进行测试。
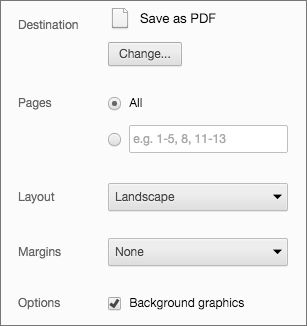
  2. 打开浏览器的打印对话框(CTRL/CMD+P)。
  3. 目标设置更改为另存为 PDF
  4. 布局更改为横向排列
  5. 边距更改为
  6. 启用背景图形选项。
  7. 点击保存

Chrome打印设置

或者您可以使用decktape项目。

主题

该框架提供了几个不同的主题:

  • black: 黑色背景,白色文字,蓝色链接(默认主题)
  • white: 白色背景,黑色文本,蓝色链接
  • league: 灰色背景,白色文本,蓝色链接(reveal.js < 3.0.0 的默认主题)
  • beige: 米色背景,深色文本,棕色链接
  • sky: 蓝色背景,细黑色文本,蓝色链接
  • night: 黑色背景,粗白色文本,橙色链接
  • serif: 卡布奇诺色背景,灰色文本,棕色链接
  • simple: 白色背景,黑色文本,蓝色链接
  • solarized: 奶油色背景,深绿色文本,蓝色链接

每个主题都可以作为一个独立的样式表使用。要更改主题,您需要在index.html中将下面的黑色替换为您想要的主题名称。

1
<link rel="stylesheet" href="css/theme/black.css" id="theme">

如果你想添加自己的主题,请参考这里的说明:/css/theme/README.md

演讲者备注

reveal.js附带了一个演讲者备注插件,可以在单独的浏览器窗口中显示每张幻灯片的备注。备注窗口还可以预览下一张即将显示的幻灯片,因此即使您没有编写任何备注,它也可能会有所帮助。按下键盘上的 »S« 键打开备注窗口。

打开演讲者视图后,演讲者计时器会立即开始计时。您可以通过单击/点击计时器来将其重置为00:00:00。

备注通过将<aside>元素附加到幻灯片上来定义,如下所示。如果您喜欢使用Markdown编写备注,请向aside元素添加data-markdown属性。

或者,您可以在幻灯片上的data-notes属性中添加备注。例如<section data-notes="Something important"></section>

在本地使用时,该功能要求从本地Web服务器运行reveal.js。有关完整设置的详细信息,请参阅此处

1
2
3
4
5
6
7
<section>
<h2>Some Slide</h2>

<aside class="notes">
Oh hey, these are some notes. They'll be hidden in your presentation, but you can see them if you open the speaker notes window (hit »S« on your keyboard).
</aside>
</section>

如果您正在使用外部的Markdown插件,您可以通过特殊的分隔符添加注释:

1
2
3
4
5
6
7
8
9
<section data-markdown="example.md" data-separator="^\n\n\n" data-separator-vertical="^\n\n" data-separator-notes="^Note:"></section>

# Title
## Sub-title

Here is some content...

Note:
This will only display in the notes window.

共享和打印演讲者备注

备注仅在演讲者视图中对演讲者可见。如果您希望与他人共享您的备注,可以使用showNotes配置值设置为true来初始化reveal.js。备注将显示在演示文稿的底部。

当启用showNotes时,导出为PDF时也会包含注释。默认情况下,注释会以一个框的形式打印在幻灯片的顶部。如果您希望将它们打印在幻灯片之后的单独页面上,请将showNotes: "separate-page"

演讲者注释时钟和计时器

演讲者注释窗口还会显示:

  • 从演示开始经过的时间。如果将鼠标悬停在此部分上方,将出现一个计时器复位按钮。
  • 当前的墙上时钟时间
  • (可选)一个节奏计时器,指示当前演示的速度是否符合正确的时间(以绿色显示),如果不符合,则指示演讲者应加快速度(以红色显示)或者是否可以放慢速度(以蓝色显示)。

可以通过在Reveal配置块中配置defaultTiming参数来启用分页计时器,该参数指定每张幻灯片所需的秒数。 120秒可以是一个合理的经验法则。 或者,您可以通过设置totalTime来启用计时器,该参数设置演示文稿的总长度(也以秒为单位)。 如果两个值都指定了,那么totalTime将起作用,而defaultTiming将被忽略。 无论基准定时方法如何,也可以通过设置每张幻灯片<section>data-timing属性(同样以秒为单位)来给出定时。

服务器端演讲者备注

在某些情况下,希望在与演示设备分开的设备上运行备注。基于 Node.js 的备注插件允许您使用与客户端备注插件相同的备注定义来实现此目的。通过添加以下依赖项来包含所需的脚本:

1
2
3
4
5
6
7
8
Reveal.initialize({
// ...

dependencies: [
{ src: 'socket.io/socket.io.js', async: true },
{ src: 'plugin/notes-server/client.js', async: true }
]
});

然后:

  1. 安装Node.js(9.0.0或更高版本)
  2. 运行npm install
  3. 运行node plugin/notes-server

插件

插件应该通过调用Reveal.registerPlugin('myPluginID',MyPlugin)来向reveal.js注册自己。已注册的插件实例可以选择性地公开一个”init”函数,reveal.js将调用该函数进行初始化。

当通过Reveal.initialize()启动reveal.js时,它将遍历所有注册的插件并调用它们的”init”方法。如果”init”方法返回一个Promise对象,reveal.js将等待该Promise对象被解决后完成启动序列,并触发ready事件。这是一个在reveal.js可以继续之前进行一些异步工作的插件示例:

1
2
3
4
5
6
let MyPlugin = {
init: () => new Promise( resolve => setTimeout( resolve, 3000 ) )
};
Reveal.registerPlugin( 'myPlugin', MyPlugin );
Reveal.addEventListener( 'ready', () => console.log( 'Three seconds later...' ) );
Reveal.initialize();

请注意,如果作为异步依赖项加载插件,reveal.js将不会等待初始化Promise完成。如果插件的init方法不返回Promise,插件将立即被视为准备就绪,不会延迟reveal.js的启动顺序。

检索插件

如果您想检查特定插件是否已注册,可以使用Reveal.hasPlugin方法并传入插件ID,例如:Reveal.hasPlugin('myPlugin')。如果您想获取插件实例,可以使用Reveal.getPlugin('myPlugin')

多路复用

多路复用插件允许您的观众在自己的手机、平板电脑或笔记本电脑上查看您控制的演示文稿幻灯片。当主演示文稿导航幻灯片时,所有客户端演示文稿将实时更新。在https://reveal-js-multiplex-ccjbegmaii.now.sh/上查看演示。

多路复用插件需要以下三个要素才能运行:

  1. 主演示文稿,具有控制权
  2. 跟随主控制端的客户端演示
  3. 使用Socket.io服务器将主控制端的事件广播给客户端

主控制端演示

从一个静态文件服务器提供服务,只有演讲者可以访问(最好只有演讲者可以访问)。这个服务器只需要在您(演讲者)的计算机上运行即可。(在您自己的计算机上运行主演示文稿更安全,这样如果场地的互联网断开,也不会影响演示。)在您的主演示文稿目录中执行以下命令的示例:

  1. npm install node-static
  2. static

如果您想在主演示文稿中使用演讲者注释插件,请确保您已正确配置演讲者注释插件,并按照下面的配置执行node plugin/notes-server在您的主演示文稿目录中。下面的配置将使其作为主服务器连接到socket.io服务器,并启动演讲者注释/静态文件服务器。

然后,您可以通过http://localhost:1947访问您的主演示文稿。

示例配置:

1
2
3
4
5
6
7
8
9
10
11
12
13
14
15
16
17
18
19
20
21
Reveal.initialize({
// other options...

multiplex: {
// Example values. To generate your own, see the socket.io server instructions.
secret: '13652805320794272084', // Obtained from the socket.io server. Gives this (the master) control of the presentation
id: '1ea875674b17ca76', // Obtained from socket.io server
url: 'https://reveal-js-multiplex-ccjbegmaii.now.sh' // Location of socket.io server
},

// Don't forget to add the dependencies
dependencies: [
{ src: '//cdnjs.cloudflare.com/ajax/libs/socket.io/2.2.0/socket.io.js', async: true },
{ src: 'plugin/multiplex/master.js', async: true },

// and if you want speaker notes
{ src: 'plugin/notes-server/client.js', async: true }

// other dependencies...
]
});

客户端演示

从公共可访问的静态文件服务器提供。示例包括:GitHub Pages、Amazon S3、Dreamhost、Akamai等。可靠性越高越好。然后,您的受众可以通过 https://example.com/path/to/presentation/client/index.html 访问客户端演示,并通过以下配置将它们连接到socket.io服务器作为客户端。

示例配置:

1
2
3
4
5
6
7
8
9
10
11
12
13
14
15
16
17
18
Reveal.initialize({
// other options...

multiplex: {
// Example values. To generate your own, see the socket.io server instructions.
secret: null, // null so the clients do not have control of the master presentation
id: '1ea875674b17ca76', // id, obtained from socket.io server
url: 'https://reveal-js-multiplex-ccjbegmaii.now.sh' // Location of socket.io server
},

// Don't forget to add the dependencies
dependencies: [
{ src: '//cdnjs.cloudflare.com/ajax/libs/socket.io/2.2.0/socket.io.js', async: true },
{ src: 'plugin/multiplex/client.js', async: true }

// other dependencies...
]
});

Socket.io 服务器

该服务器接收来自主幻灯片的 slideChanged 事件,并将其广播给连接的客户端幻灯片。这个服务器需要公开访问。您可以使用以下命令运行自己的 socket.io 服务器:

  1. npm install
  2. node plugin/multiplex

或者您可以使用 https://reveal-js-multiplex-ccjbegmaii.now.sh/ 上的 socket.io 服务器。

您需要为主控和客户端演示生成一个唯一的密钥和令牌对。要这样做,请访问 https://example.com/token,其中 https://example.com 是您的 socket.io 服务器的位置。或者,如果您要使用 https://reveal-js-multiplex-ccjbegmaii.now.sh/ 上的 socket.io 服务器,请访问 https://reveal-js-multiplex-ccjbegmaii.now.sh/token

欢迎您将演示文稿指向正在运行的Socket.io服务器https://reveal-js-multiplex-ccjbegmaii.now.sh/,但可用性和稳定性不得以。

对于任何关键任务,我建议您运行自己的服务器。最简单的方法是安装now。安装完成后,只需从reveal.js文件夹运行以下命令即可部署自己的Multiplex服务器:now plugin/multiplex

将socket.io服务器作为文件静态服务器使用

socket.io服务器可以充当您客户端演示的静态文件服务器,就像示例中的https://reveal-js-multiplex-ccjbegmaii.now.sh/一样。 (在两个浏览器中打开https://reveal-js-multiplex-ccjbegmaii.now.sh/。在一个浏览器中导航演示页,另一个浏览器将更新以匹配。)

示例配置:

1
2
3
4
5
6
7
8
9
10
11
12
13
14
15
16
17
Reveal.initialize({
// other options...

multiplex: {
// Example values. To generate your own, see the socket.io server instructions.
secret: null, // null so the clients do not have control of the master presentation
id: '1ea875674b17ca76', // id, obtained from socket.io server
url: 'example.com:80' // Location of your socket.io server
},

// Don't forget to add the dependencies
dependencies: [
{ src: '//cdnjs.cloudflare.com/ajax/libs/socket.io/2.2.0/socket.io.js', async: true },
{ src: 'plugin/multiplex/client.js', async: true }

// other dependencies...
]

它还可以同时扮演主演演示文稿和客户演示文稿的静态文件服务器的角色(只要您不想使用演讲者备注)。 (在两个浏览器中打开https://reveal-js-multiplex-ccjbegmaii.now.sh/。在一个浏览器中浏览幻灯片,另一个浏览器将更新以匹配。在第二个浏览器中浏览幻灯片,第一个浏览器将更新以匹配。)这可能是不可取的,因为您不希望在演示过程中让观众搞乱您的幻灯片。 ;)

示例配置:

1
2
3
4
5
6
7
8
9
10
11
12
13
14
15
16
17
18
19
Reveal.initialize({
// other options...

multiplex: {
// Example values. To generate your own, see the socket.io server instructions.
secret: '13652805320794272084', // Obtained from the socket.io server. Gives this (the master) control of the presentation
id: '1ea875674b17ca76', // Obtained from socket.io server
url: 'example.com:80' // Location of your socket.io server
},

// Don't forget to add the dependencies
dependencies: [
{ src: '//cdnjs.cloudflare.com/ajax/libs/socket.io/2.2.0/socket.io.js', async: true },
{ src: 'plugin/multiplex/master.js', async: true },
{ src: 'plugin/multiplex/client.js', async: true }

// other dependencies...
]
});

MathJax

如果您想在演示文稿中显示数学公式,可以通过包含此插件轻松实现。该插件是对MathJax库的一个非常薄的包装。要使用它,您需要将其作为reveal.js的一个依赖项进行包含,在这里了解更多关于依赖项的信息

该插件默认使用LaTeX,但可以通过math配置对象进行调整。请注意,MathJax是从远程服务器加载的。如果您想离线使用它,您需要下载库的副本并调整mathjax配置值。

下面是插件配置的示例。如果您不打算更改这些值,根本不需要包含math配置对象。

1
2
3
4
5
6
7
8
9
10
11
12
13
14
Reveal.initialize({
// other options ...

math: {
mathjax: 'https://cdnjs.cloudflare.com/ajax/libs/mathjax/2.7.0/MathJax.js',
config: 'TeX-AMS_HTML-full', // See http://docs.mathjax.org/en/latest/config-files.html
// pass other options into `MathJax.Hub.Config()`
TeX: { Macros: { RR: "{\\bf R}" } }
},

dependencies: [
{ src: 'plugin/math/math.js', async: true }
]
});

如果您需要HTTPS传递或者稳定的特定版本的服务,请阅读MathJax的文档。

在Markdown中使用MathJax

如果您想在Markdown写的演示文稿中包含数学公式,您需要将公式用反引号包裹起来,这样可以避免LaTeX和Markdown之间的语法冲突。例如:

1
`$$ J(\theta_0,\theta_1) = \sum_{i=0} $$`

许可证

MIT许可证

版权所有 (C) 2020 Hakim El Hattab, http://hakim.se